
A wooden flag is a fun project to make and it is very accessible for the beginner.
If you have some basic carpentry skills and enjoy painting, then you should be able to make an impressive wooden flag. In this post we will look at how to make a wooden flag and some ways you can even sell these online if you choose to.
Here are some examples of what you can do:
The best part? It is really inexpensive to make a flag like this. And once you make it a couple times it becomes a simple process.
Also, you can transfer this skill towards making wooden signs and other wall decor.
You can even sell these on Etsy or your online blog if you wanted to. In fact, this is a great project if you are looking for woodworking items to sell. You can go to my post here if you are interested in Etsy and selling products online.
Wood flags give off a rustic look that is sure to grab attention in your home. I like the way you can distress it to make it seem weathered and old. The vintage look contrasts well with other items in my house that are cleanly painted and modern.
What are some of the different things you can do when making your own wood flag?
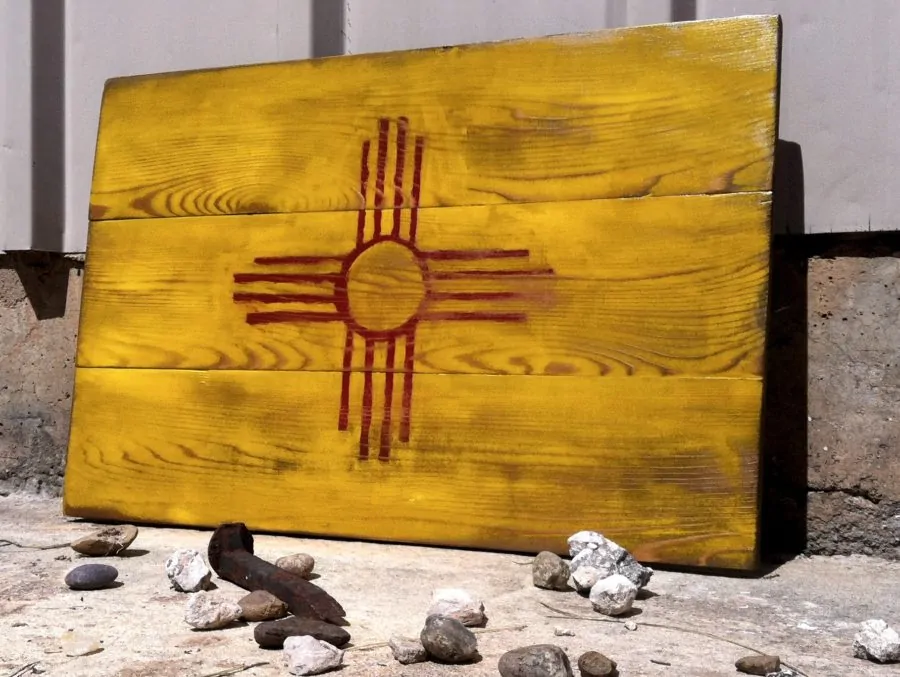
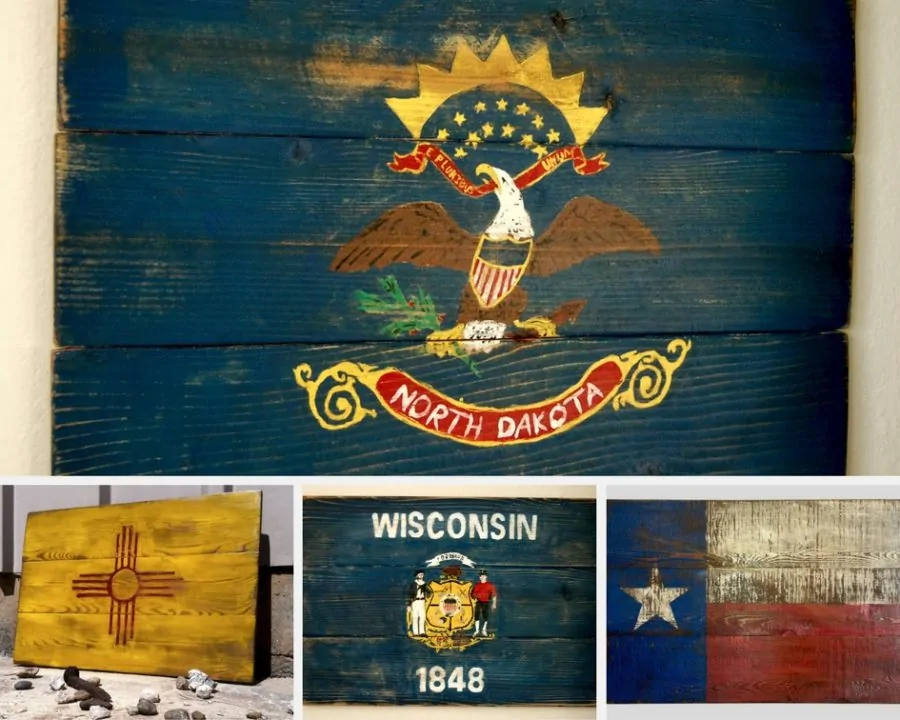
1. Different State or Country Flags
Depending on how skillful your painting abilities are, you can do any of the flags available. I have done several that I sold on Etsy, including Tennessee, North Dakota, Alaska, and Colorado.
Some were more difficult than others, but for the intricate ones I printed off an outline of the flag design and traced it onto the wood.
Hand painting is not the only way to do this. You can transfer the design, use a laser engraver, or CNC router. This is where you can use your imagination; if you are stumped then I suggest looking on Etsy for different ideas because there are a lot of sellers making all kinds of this type of decor.
2. Different Sizes
The way I am going to show you here will just be a template for how to make any size of flag. The size I do is big enough to look nice but small enough to easily handle and doesn’t take up too much paint.
Sizes can range from small 6″x4″ all the way up to a massive flag that covers your whole wall.
3. Framed
You can add a wooden frame like in this photo:
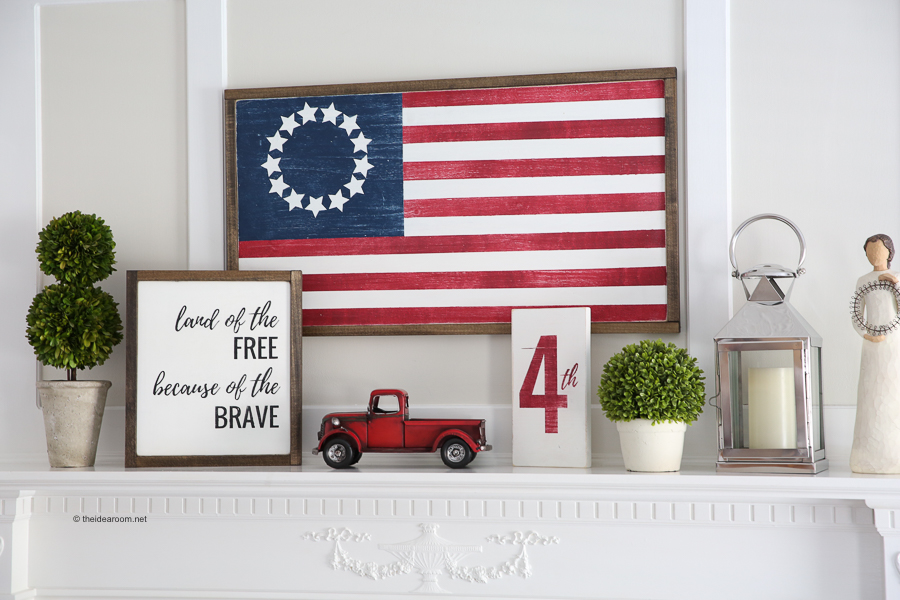
This is a cool step that makes it look like it’s made for above the mantel.
The following will show you how I make a wood flag along with what materials and tools you will need. It can obviously be made in a number of different ways, but they all follow the same principles.
Materials
1. Wood Boards
I always like to use cedar for my flags because it seems more rustic than others. I used 1×6 boards.
Other options include pine, reclaimed wood, etc. Anything that is about 3/4″ thick can be used.
A cheaper way to do this would be to use a sheet of plywood. You can cut strips as wide as you like, from 2″ all the way to a foot, and attach them together. After painting, this will look similar to solid wood boards.

2. Paint
Acrylic paint works well for this application. It is easy cleanup (water) and inexpensive. Also, you should be able to find it at Wal-Mart or craft stores.
If you are feeling more creative there is no reason to limit yourself only to acrylic paint of course.
3. Clear Coat
I like to use polycrylic to seal the flag. It is water based and dries clear. Sometimes it can leave a little milky film, but this almost always goes away after a few days.
Sealing it is not required, but it makes me feel better about the piece lasting longer and not getting messed up or dirty.
A spray can of the clear coat is really the quickest method for this project. It also prevents any smearing of the base paint when brushing.
4. Sawtooth Hanger
You will need some way of hanging the flag on the wall. This can be done with a wire picture hanger, mounting hooks, etc. I use a sawtooth hanger because it is easy to install and hang.
These sawtooth hangers are usually available at any craft place.
5. Kreg Pocket Hole Screws (Option 1)
You will need these if you choose to use pocket holes to connect the boards. (Find out about pocket hole screws here)
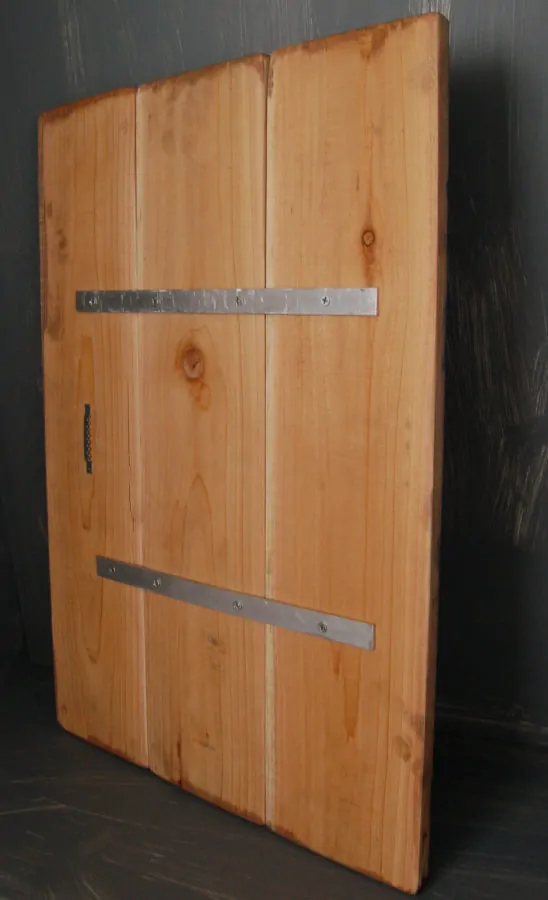
This method is great, but it doesn’t look great on the back. If the way it looks on the back is important to you (like if you are selling on Etsy or somewhere), then I would use a strip of aluminum or wood to attach the pieces.
6. Flat Aluminum 1″ Wide x 1/8″ Thick (Option 2)
Determine the height of your flag. You will need a length of flat aluminum that is double this height.
Instead of using pocket holes you can use a piece of aluminum to connect the boards together. This requires more tools but it looks pretty nice when you are finished.
Tools
1. Miter Saw
This is to cut the wood. A circular or even hand saw will work as well.
2. Random Orbital Sander
Use this to smooth the wood before assembly and to distress the wood after it has been painted. One could also do it by hand, but the sander is quicker.
3. Cordless Drill
For pocket holes or connecting via aluminum piece
4. Paint Brushes
For painting the flag and finishing with polycrylic
5. Kreg Jig (Optional)
You will need a Kreg Jig for pocket holes if you go this route.
Step by Step
1. Cut Boards to Length
Determine what size flag you will want.
For my project I did 24″ wide with 3 1×6″ boards. So this comes out to 24″ x 16.5″. This scale of roughly 3:2 is common with flags so it looks normal.
Another common scale is 5:3. Depending on what you have to work with you could go either way. Just stay within that range and it will be good.
2. Sand
You don’t want to paint on a rough surface or have sharp splinters everywhere. Sand around each board and smooth the faces down before assembly.
I usually start with 120 grit sandpaper unless there is significant sanding to be done. In that case I go with 80 grit. It can scratch your surface though, so don’t go too hard with it.
Go lightly over the rest of it with 220.
3a. Connect Boards – Option 1
This can be done with pocket holes like in the diagram below:
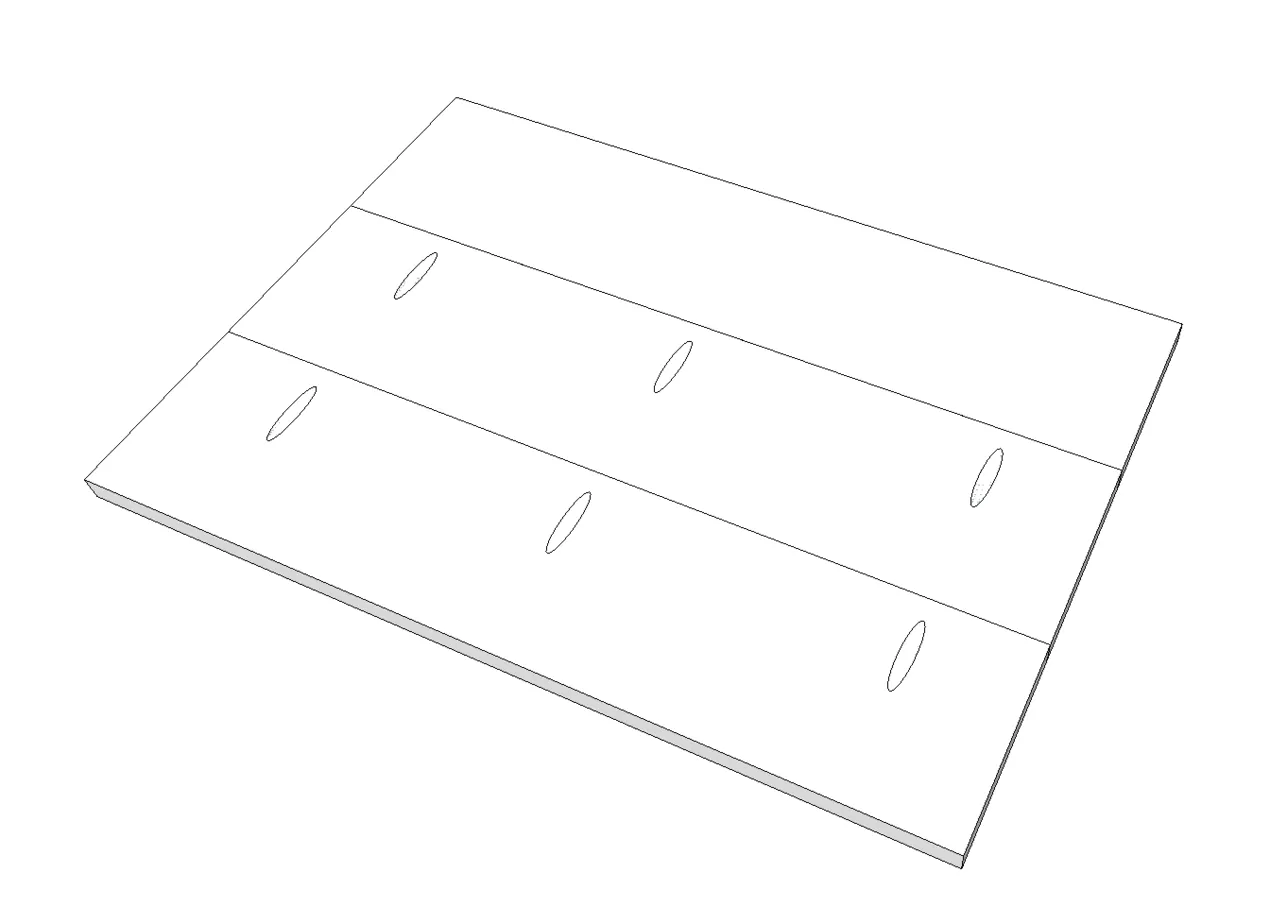
Use a Kreg Jig to make the pocket holes (on 3/4″ setting if you have 3/4″ boards – use this chart if you are unfamiliar) and clamp the boards together on a flat surface.
Drive the screws to hold it together.
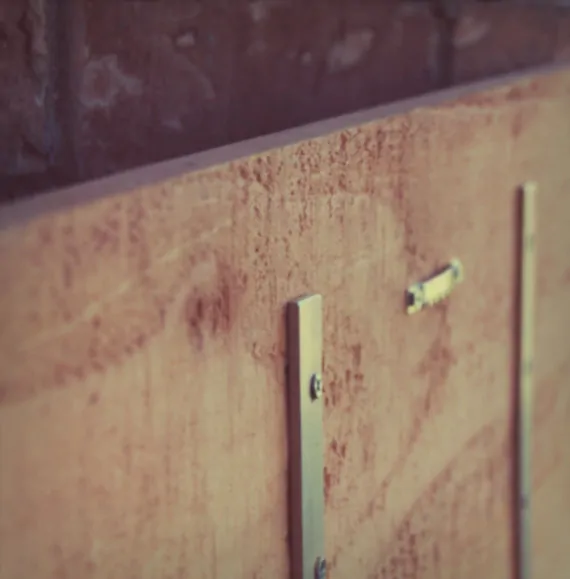
3b. Connect Boards – Option 2
1. Cut your flat aluminum pieces 2 inches shorter than the height of the flag. This will leave an inch at the bottom and top. In the photo below I cut the aluminum piece a little too short:
Cut enough so that you can put in 2 screws per board like the middle board in the photo above.
2. Drill 2 holes in the metal piece at each board location. Use a drill bit that matches what screw you are using.
3. Use a countersink bit for each hole if you have one. This will allow the screw to fit nicely into the aluminum slat. They look like this:
4. Clamp the boards together lightly, then drive screws into each hole of the slats to hold it all together.
4. Paint Flag
At this point you will need to take some of your artistic ability and put the brush to the wood.
It is up to you what type of flag to make; there are many options.
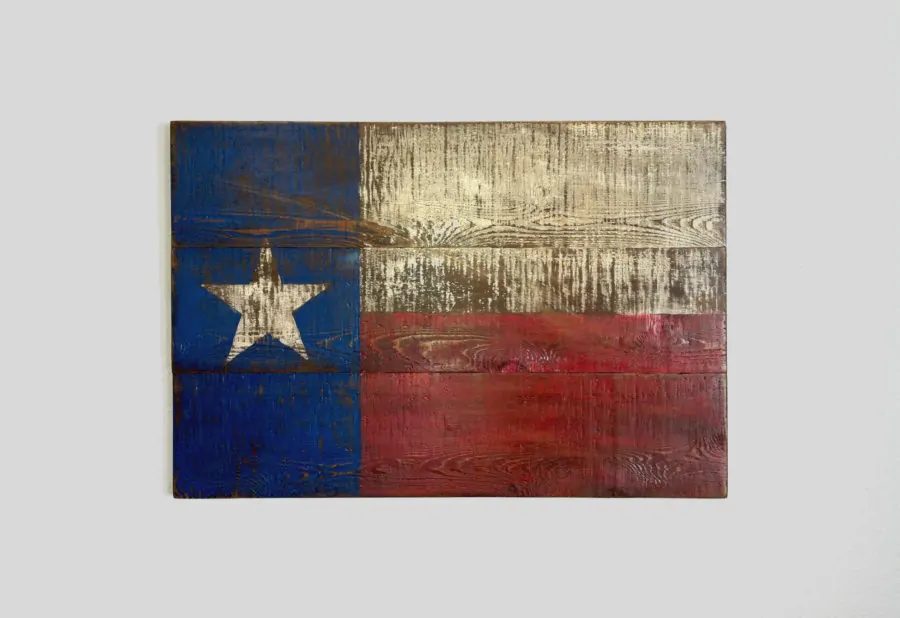
I started out making a Texas flag because that is where I live and it is relatively easy. There are three sections and one star.
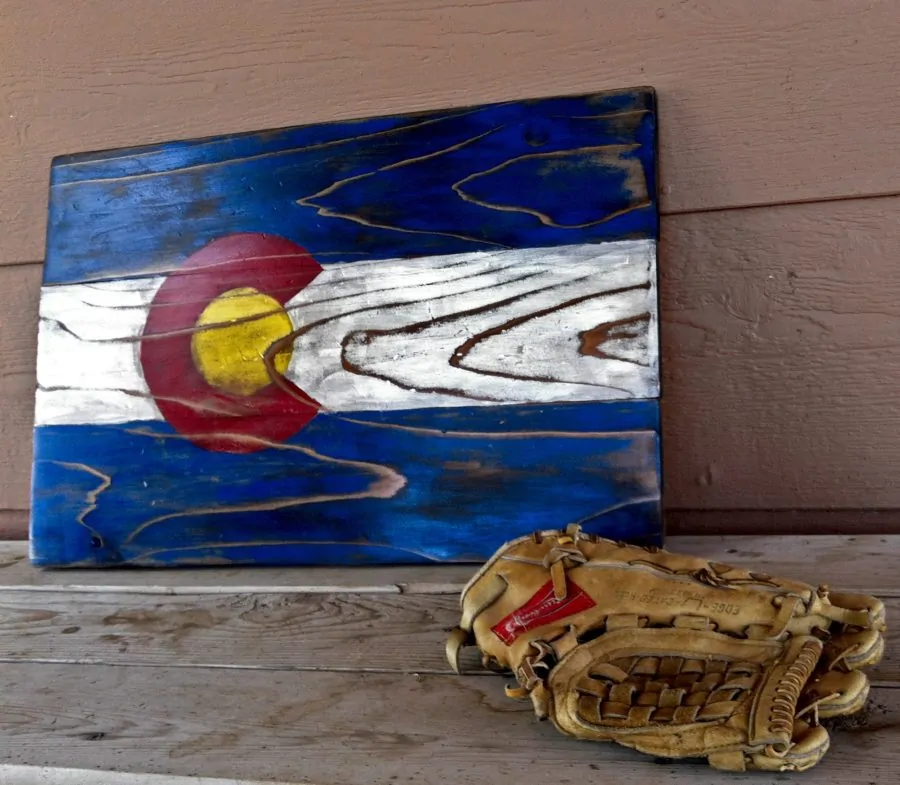
Or the Colorado flag is not too difficult either:
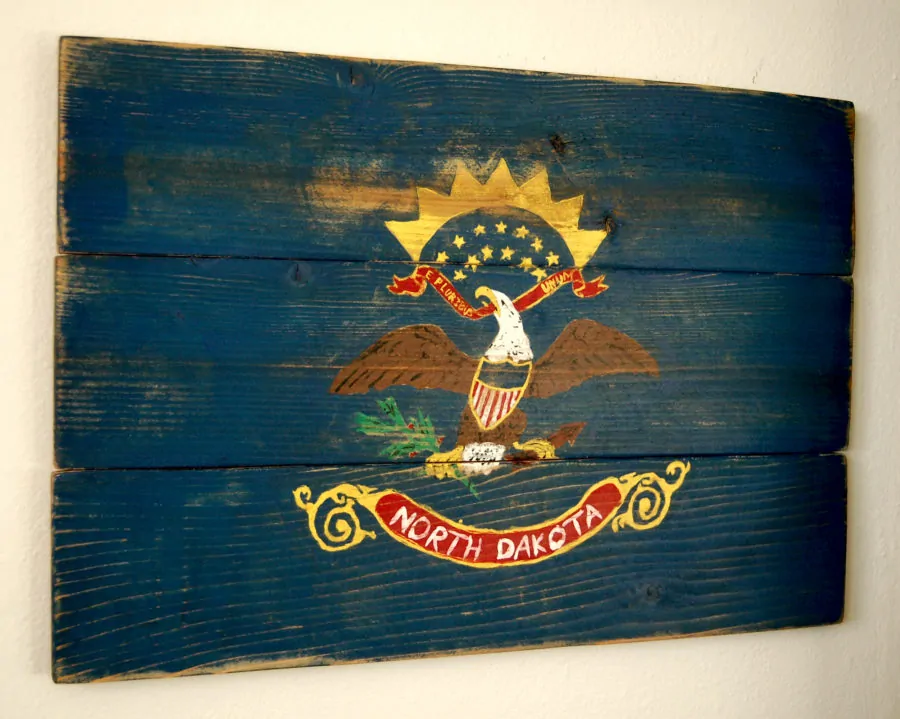
But doing something like North Dakota will require significantly more time and effort:
More than likely your painting will NOT be perfect. But that is what I like about it so much. You can see the brush strokes and it gives it some movement. No two are the same.
Choose a flag you care about and would enjoy seeing on your wall and get started.
5. Distress
If you do not want it to be rustic looking and distressed then you should skip this step.
For everyone else, this part is pretty easy to do, but also easy to mess up if you are not careful.
First, be sure the paint is fully dry and cured. Sanding can sometimes blend the paint and this is not what we want.
Take a random orbital sander with a 220 grit pad or 150 even. Sand over the painting very quickly and lightly. See what this does – did it take off a lot of paint? None? Determine how weathered you would like it to look.
Continue with the sander until you get the result you want. Just be careful not to go too far and take off too much paint. If you have an intricate design, then don’t sand it at all – or not much.
6. Stain and Seal
To finish off the distressed + weathered look you need to rub some stain into the exposed wood.
Take a rag and dip it in some dark brown stain like dark walnut, and rub it over the entire flag. Wipe it clean with another rag.
Let this dry for 24 hours.
At this point you can either leave it as is or seal it with some polycrylic. I have brushed it on and used an aerosol can, both will work.
7. Install Hardware
Attach the sawtooth hanger on the back or whatever you choose to use to hang it on the wall. That is it. You should be finished at this point unless you want to add a frame or do some extra stuff to it.
Conclusion
Building a wood flag is a fun, simple activity that will yield awesome results. There are so many things you can do with it, like hang it for home decor, give it as a gift, or even make it into a table top.
If you are interested in similar projects like this, be sure to go to our list of beginner woodworking projects.
If you would like to do this project, but are not such exactly how to get started, go to my Tools for the Beginner and check out my Get Started page. These have simple info that will help you determine what you need to start woodworking.
Great site! Well done looks great and reads well
Hi,
Great post!
I have a couple questions on this as I’m just starting out working with wood.
1. I’ve read a few different articles on this type of work and was wondering if I should use a primer (like gesso) for longevity. Looks like it’ll add to the cost but might be worth it.
2. What do you think about using dowels to join the wood? My reasons are overall cost and less shipping weight)
3. Lastly…what did you charge for the Texas flag? Just to get an idea of where to start.
Thanks again for sharing this. I’m excited to start and see where this goes.
-Jim
Hi Jim, For 1 and 2, I think those are both great ideas that you could definitely try. I’m a fan of testing various ways to find what works for you the best. For the price, it varied some but I think it was between $50 and $70. I marketed as a high end style flag that was hand painted so each was unique. Not sure if there is a market for that now, but you won’t know unless you try.