Do you want to showcase your DIY projects for everyone to see? A website is a great way to do this, and with a little work and traffic you can even start earning money. Keep reading to see how to start a DIY blog.
Note: Some of the links below are affiliate links, which means that if you choose to make a purchase, I will earn a commission. This commission comes at no additional cost to you and helps me run this website. I recommend products that I like and have experience with.
[toc]
Of course if you have never started a website before it can seem like a daunting task at the beginning. It really is not that complicated though.
If you are totally new, there are a few things that you should know before diving in, otherwise skip this section:
1. Domains
You will need a domain name. This is the web address that you choose. There are a few different places to buy one of these from. I will talk about them below.
2. Hosting
Your host provider is where your website resides. All the files, images, etc have to sit somewhere for other people to see them. The hosting provider keeps these and keeps your website online.
3. WordPress
WordPress is the content management system that allows you to easily write new posts and upload pictures. It is really common online, and most hosting providers make it really easy to install.
4. Themes and Plugins
There are themes and plugins within WordPress. These are used to enhance your website and make it look and function better.
As you get more experience you can begin to get into more detailed aspects of WordPress, although to have a successful website this is not completely necessary.
How to Start a DIY Blog
It does not matter what your goals are with your blog, the steps to starting are the same. You could be looking to do a number of different things, from showing your projects off to people, trying to earn money, building a creative outlet for yourself, or all of the above.
1. Buy a Domain Name
This happens at a registrar. What is a registrar? It is a place where domain names are sold, basically. It is a where you buy and register a domain name.
Namecheap is where I keep all of my domain names. They have a good, simple interface.
Search for domain names using their search feature.
For brainstorming domain names, I recommend Lean Domain Search. It is simple and effective. I also like Shopify Name Generator.
Domain names are not expensive, and if you are confident in your name I recommend buying it for more than a year because Google likes to see that its not about to expire. You should be able to pick one up for $9.99 a year. If it is more expensive than that then you should look for a different one.
2. Buy Hosting
The next step is to get a place to keep your website. There are a ton of hosts out there accommodating all kinds of levels of bloggers and businesses.
For starting out you could use Bluehost. It is cheap and good for an introductory website that will not get much traffic.
A solid choice for someone who wants to build an audience would be SiteGround. They have great pricing and the hosting plans will be faster and better able to handle more traffic than Bluehost.
You should get shared hosting if you are beginning a new website and need time to build it out. There is no reason to go for an expensive hosting plan just yet. These plans should all be below $10 a month.
You may need to pay for all 12 months up front, but it is usually cheaper this way than paying monthly.
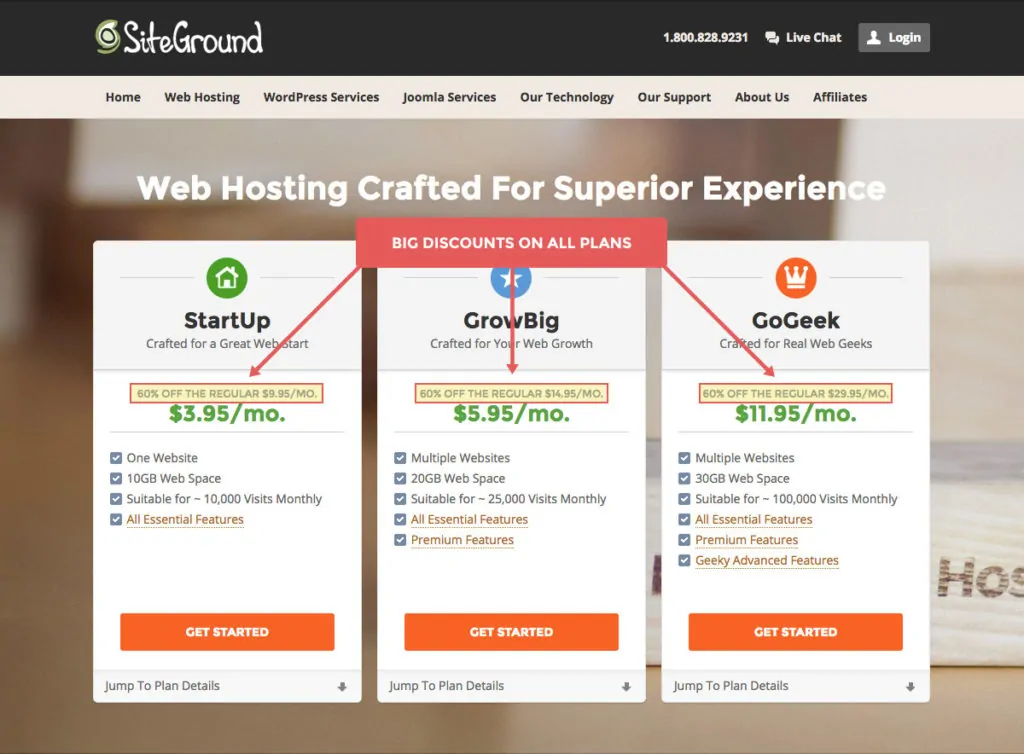
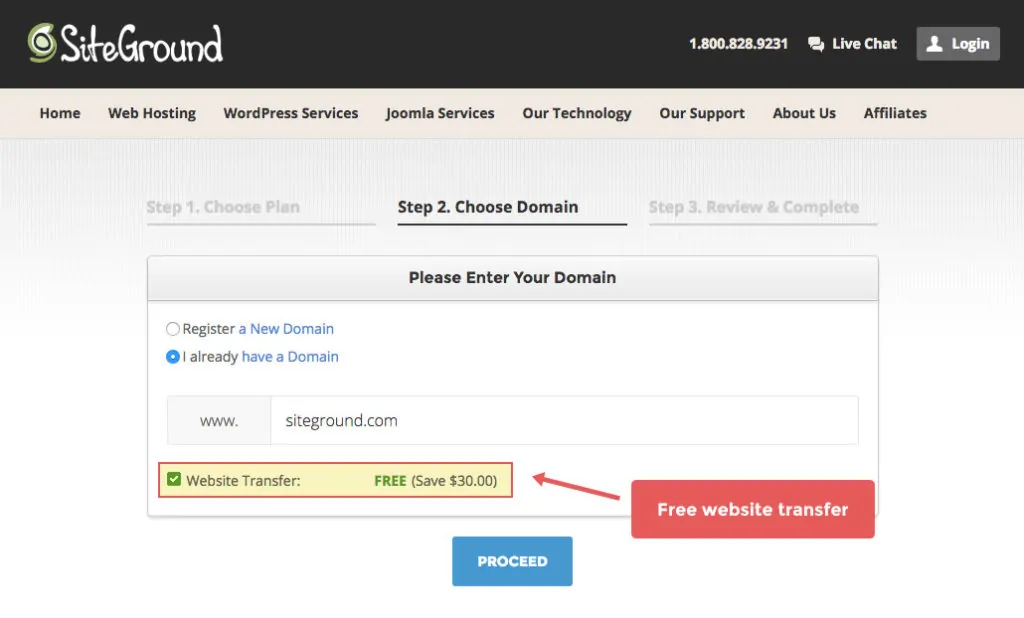
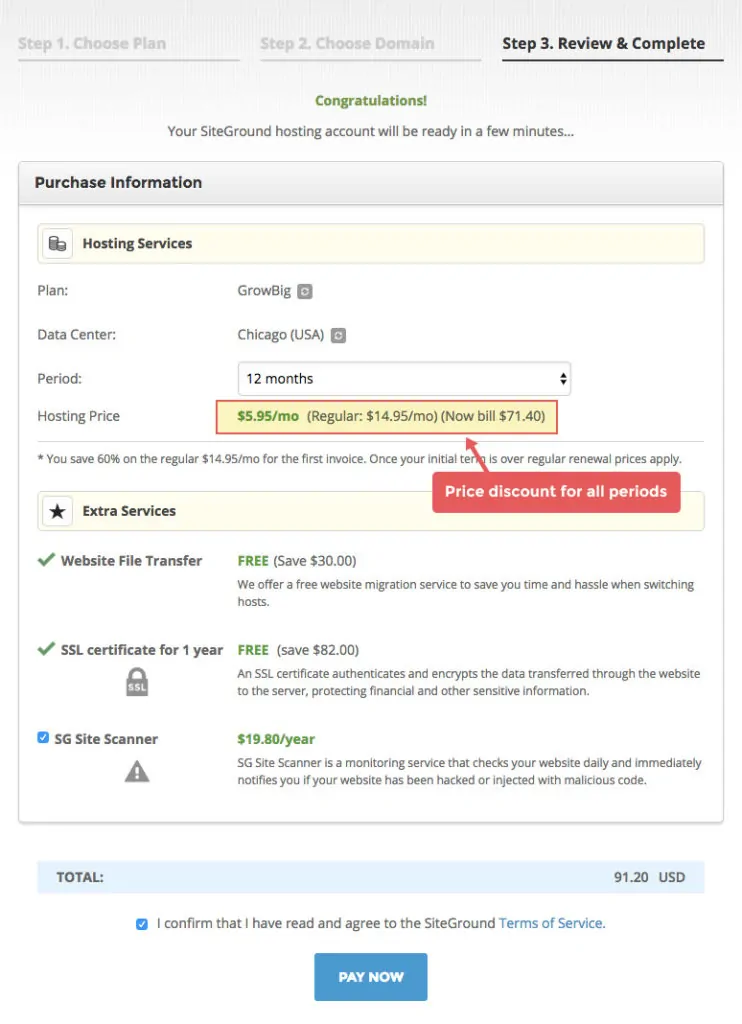
The images below show how to quickly sign up with SiteGround:
Choose the “StartUp” plan unless you need the higher metrics of the others.
If you have bought a domain on Namecheap then enter it here or register a domain through Siteground.
The website transfer is if you already have a website hosted somewhere else and need to move it to their hosting system.
Their price discount works for any length of time that you choose during sign up. After a year you will get regular pricing which is only slightly more expensive (this is normal for all hosting companies).
3. Log In to cPanel and Point Domain at Website
This step involves two processes. You have bought the domain and a hosting plan. But how do you attach the domain name to that host? The registrar needs to point your domain name at where your website is hosted.
Log in to your hosting provider. This should be called cPanel. At this point you need to find where it says “nameservers”. There should be two of them. Copy these values down.
Now go back to Namecheap, or whoever you bought the domain from, and go to edit your domain.
Select Custom DNS in the nameservers category, and paste those two values there. Here are Namecheaps own directions. It shouldn’t take more than 30 minutes for these changes to take affect, although they warn that it could be up to 48 hours (I’ve never seen it take this long).
4. Install WordPress
Most hosts have an easy way to get WordPress installed. They usually also have step by step tutorials for their specific method of doing so.
Some hosts have a so-called one click install. This is fine if they provide it. Follow their directions for installing it, and then log into the admin area of your website.
An Aside: It can be helpful to manually install WordPress to understand how this all works together. It is much more technical, but you are choosing to build a website after all. Some things will be technical. You can do this by downloading the latest wordpress package from wordpress.org and going through the steps of setting up MySQL. I won’t go through this here, but if you want to do it so you know the ins and outs, a Google search should bring up better tutorials than what I could write here.
5. Website Settings
The first thing you should do is make sure that your website can be found by search engines. Under “Settings->Reading” you should see a checkbox for Search Engine Visibility. Make sure this is NOT checked.
Beyond this there are other settings that you can change for your specific purpose. I may do a post in the future on more advanced WordPress site setup, but this should get you started for now.
If you need more help I recommend the website wpBeginner. It has a ton of helpful info about WordPress.
6. Install Plugins
Plugins help you accomplish tasks that are not inherent in the initial WordPress install. Since everyone needs a different type of website, this allows for functions to be added in as needed.
Plugins WILL slow down your website, so make sure to be careful about installing too many or frivolous ones.
Some are necessary, and I will list them here with a short explanation on each one:
1. Yoast SEO
This plugin will help you get your site seen by search engines like Google. There is more to it. Install it and set up the basic things and learn how to use it.
2. Akismet
This comes with a wordpress install. It will help filter out spam from your comments section.
3. Contact Form 7
You need a contact page on your website so people can send you emails.
4. Auto Terms of Service & Privacy Policy
This is a simple plugin that allows you to create a terms of service page and privacy policy easily.
5. Autooptimize and WpSmush
These plugins will help compress your images and other files to help keep your site running fast.
6. Social Warfare
This is great for social sharing. It allows you to put social buttons on all your posts. I use it mainly to serve up special Pinterest images for each post.
There are a ton of plugins available for you to use, but I would simply add them in at an as needed basis. Once you get these initial ones setup you should focus on producing content.
7. Install Theme
A theme is important to differentiate yourself from the standard WordPress template. You should not worry about it too terrible much though because ugly websites can do just as well as pretty ones. And the fancy ones can be really slow which is something you want to avoid at all costs.
For someone starting out I recommend Generate Press. It is free, looks nice, and has some customizer options that will help you make your site yours.
They offer a premium version that you can get if you know you want that extra functionality and don’t mind paying for it.
Another popular option is Genesis Framework by Studiopress. They have a ton of options for fancier looking designs, but they are all paid options. These will be clunkier, so I wouldn’t get one unless you found one that you just had to have.
Don’t spend too much time here – it is a common sticking place for people to meander. I even did it for a while. Your theme and the way your website looks just does not matter as much as you think it does. This is especially the case if you have no content and no one is even coming to your site in the first place.
Install a simple theme, get the settings going, and move on to the next phase.
8. Next Steps
From here on out there are so many things that you can do that I will just list off some of the important ones:
- Logo
- Theme Color
- Social Channels
- Email Opt In
- Categories
- Menu Setup
The important thing to do is to keep working on it everyday. Even if you don’t feel like writing or adding content, just log in to the dashboard and mess around. Get as familiar with it as you can.
It is a cumulative thing. After writing, changing your site, adding this and that, etc. you will start to become an expert at it.
From this point on content is king. Get to writing, posting pictures, etc.
Conclusion
If you want to start a diy craft blog then the steps are really straightforward. There are tons of resources out there to help you, including this short guide.
What do DIY blogs have in common? They all have tutorials and how to guides on making things. From there on they are so different. People have different ways of explaining things and building a step by step tutorial.
I recommend making some posts on stuff you are most familiar with. Do you make decorative crafts? Sewing? Woodworking? Talk about certain aspects of each hobby. Explain parts of it as if you were talking to a total newbie.
If you are not familiar with any of it then your path will be more difficult but by no means impossible. Blog about a beginners journey, learning all the skills and aspects of it. (If you want to get started in woodworking go here)
Each post should really be close to 1000 words. This will help it be useful for your readers and to search engines.
This should get you started. I plan on making a full beginners guide to this in the future.
Feel free to comment below!


Hi Ty, Thank you so much. With limited success, I have been trying to sell items I build from reclaimed materials of all kinds. I think I need to now go to next level and your simple guide is at the right level for me as a beginner on hosting a site. Look forward to more of your tips.
All the best, David A.